Thursday, July 31, 2014

Chubby Chums Make Life Fun

Dang.  I was going to link to the card where I first noticed Chubby Chums but cannot find it now.  It had one of the animals--owl?--with a large star diecut out of the card mounted of a field of stars.  It was very fun.  Poo!  Wait!  Found it.

Well, I had to buy these stamps after seeing that.  Like I don't have enough stamps, even ones I haven't used yet (shhh---don't tell my man).  But still, had to.  This is the first card using the stamps and the first card in a great long while that I've colored with my Spectrum Noirs.  It felt a little weird.  Like riding a bike when you haven't for the longest and it's just a bit wobbling going.

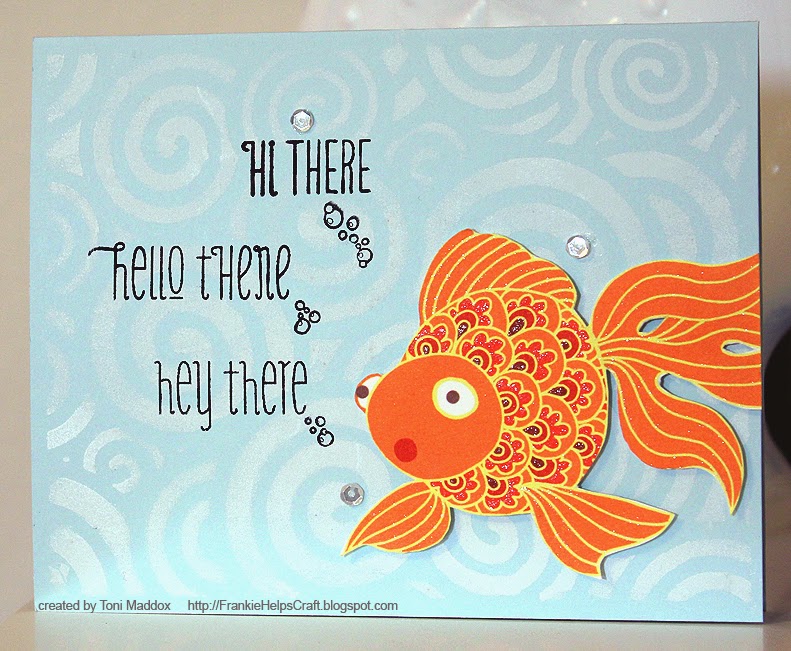
I stamped 3 of the chums atop each other and embossed them.  I then colored them, added a leftover strip of the polka dot DP and stamped the sentiment.  I waffled between card base colors and decided to go with white so the chums would really pop.  I did want more dimension, googly eyes would have been fun but I don't have the right sizes, so I used Glossy Accents instead.  I also added 3 tiny Enamel Accents dots--originally was thinking sequins but they seemed too large compared to the DP dots.  There you have it.

I just realized I didn't color the dogs tongue or the cat's nose!  Pretend they're pale pink.

The Details:  Paper Smooches Chubby Chums stamps, Penny Black Nature's Wishes sentiment, Glossy Accents, Black Enamel Accents, Versafine Onyx Black, Spectrum Noirs, PTI white cardstock base, Crafter's Companion cardstock for coloring, Hampton Art clear embossing powder

I'm entering this in Simon Says Wednesday Anything Goes, Fab 'n' Funky #224 Walk on the Wildside, Crafty Creations #268 Just for Fun, Without Words Cute and Fluffy, and City Crafter #222 Animal Magic


Sunday, July 27, 2014

Almost One Layer Get Well

I have a get well card for you today.  I hope it will cheer someone up.  I used Distress Inks on non-watercolor paper for an interesting ink effect.  Reminds me a bit of pointillism which has always fascinated me.

First, I subtly sponged one of the stencils I recently made with my Cameo.  I concentrated on the middle only to give a fade out effect on the edges. Next I inked up the stem with a couple of different greens then stamped again with a different green.  The ink beaded up nicely on the clear stamp for the pointillism effect.  The same goes for the flower--first yellow, then orange and brown center.  I re-stamped in orange.  The sentiment is done in brown.  I originally was going to make this a one-layer card but seemed stark so I mounted on a soothing feel-good blue.

The Details:  Papertrey Ink white cardstock, Bazzill Basics Icy Mint cardstock, Penny Black Petal Power stamps, Stampin' Up Versatile Verses sentiment (NBUS), and Distress Ink in Walnut Stain, Mowed Grass, Tumbled Glass, Bundled Sage, Mustard Seed, Spiced Marmalade, lattice stencil made with my Cameo and stencil plastic

I'm entering this in Less is More #182 Anything Goes, Little Tangles #41 Stencils  

I'm Late, I'm Late

I couldn't resist making another card with the current CASology "Run" theme.  Remember Alice in Wonderland and that frenetic rabbit?  I'm late, I'm late!  And who doesn't need a late for birthday card?  I know I certainly do on an unfortunately regular basis!

So, stamped the rabbit and hopping lines then sponged the hearts.  I added Wink of Stella (which I can't believe actually photographed).  I next stamped the sentiment and heat embossed it for textural interest.  The designer paper is a fun touch.

The Details:  PTI white cardstock, Paper Studio Uptown Flair designer paper, Stampendous Perfectly Birthday sentiment, Memento Tuxedo Black, LadyBug and Love Letter, Versamark, Hampton Art clear embossing powder, Heidi Swapp stencil, Lawn Fawn Happy Easter (hopping lines), Alice in Wonderland unmounted stamps that I got off eBay ages ago

I'm entering this in CASology #105 Run, Simon Says Wednesday Emboss It, Less is More #182 Anything Goes, Little Tangles #41 Stencils, Seize the Birthday without twine topping

Saturday, July 26, 2014

Christmas Sticker Cheer


 The current challenge over at Keep It Simple is stickers.  What a great opportunity to use up some Xmas stickers that were passed on to me.  Let the holidays begin!

The Details:  Fiskars All That Glitters ("Christmas") and Sentiments ("Cheer"), Colorbox Cranberry and Moss Green pigment inks, Hampton Art clear embossing powder, everything else was gifted to me and are of unknown origin

I'm entering this in Keep It Simple! #45 Only Stickers, Holly Jolly Christmas Deck the Halls, Weekly Christmas Card Challenge #34 Inspiration Photo, Simon Says Wednesday Emboss It

Run With It

The current theme at CASology is Run so I ran with it.  Yes, I just wrote that.  LOL.

Rather self-explanatory card. I diecut the rainbow  and watercolored the ends.  Then dripped the same colors beneath.  Those Peerless colors are vibrant, aren't they? 

The Details:  Tim Holtz watercolor paper, My Favorite Things rainbow die, Peerless watercolors, Darice cloud embossing folder, Stampendous white Detail Fine embossing powder, foam tape

I'm entering this in CASology #105 Run, Simon Says Wednesday Emboss It, Less is More #182 Anything Goes  

Friday, July 25, 2014

Orchid Sympathy Card

I attempted this card a few times these last few days, inspired by the previous Muse but I just wasn't feeling it until I just let the ink do what it wanted to do.  Unruly stuff!  ;-)   I'm feeling this might read "happy" although on my monitor the Seedless Preserves reads pinker than it is.  Thoughts?  In any case, I love the simplicity and balance with the curved flowers and curved corner.

I decided to try to take another pic; this time outside.  The color reads more accurately purple now but the texture of the watercolor paper is lost.

Exciting news:  my Kuretake Gansai Tambi watercolors have arrived!

The Details:  Clearly Besotted Thinking of You stamps, Distress Inks in Seedless Preserves, Mustard Seed, and Peeled Paint, Versafine Onyx Black, Tim Holtz watercolor paper, mystery card base cardstock

I'm entering this in CAS on Sunday #38 SympathyAddicted to Stamps & More #105   


Saturday, July 19, 2014

Yeah, baby!


I was very excited to receive my first CAS-ual Fridays stamps so I combined them with the  current CASE Study and Card Concept colors.  I thought it would be fun to cut out the flower with a circle and inset it.  I then mounted the panel with foam tape on the card base.  I then stamped & embossed the banner sentiment in gold.  You can just tell in the photo that I cut out the banner in vellum and layered it.  I tried a few different colors then went with classic black for the bottom sentiment which I embossed in white.  I added white Enamel Accents around the flower--I love the dimension and shine there.  A few holographic gold sequins finish it off.

The Details:  Pop Tone Sno Cone cover stock, CAS-ual Fridays Woot Woot stamps, The Good Life 12x12 designer paper, Darice holographic gold sequins, gold embossing powder, Versamark, Stampendous detail white embossing powder, white Enamel Accents

I'm entering this in CASE Study #200, Simon Says Spots & Dots, The Card Concept #14 Colors (clean and layered), Addicted to CAS #43 Celebrate

Thursday, July 17, 2014

Watercolor Hydrangea

I have a guest designing spot at Paper Crafting Challenges this week where the challenge is to use blue, purple and green.

For this card I cut a circle out of scrap card and positioned the resulting mask over my watercolor paper where I wanted my hydrangea.  I then spattered highly diluted Distress Ink to get the basic shape identifiable.  I did want some spatters outside the image so took off the mask and spattered a bit before putting the mask back on and spattering in the circle more.

Removing the mask, I used a combination of the two colors and water to create the illusion of blossoms.  I really like how there is still white space among the blossoms.  I tend to overwork my watercolor so yay me!  I painted a couple of leaves and stem to finish off the flower.  I've been in a glitter mood so decided to add that to the butterfly.  I tried my rarely used Xyron but the adhesive was uneven and spanned the open areas.  I tried stick glue--umm, not so much (OMG, it just occurred to me I could use stick glue for dimension in a stencil and then cover it in glitter ala the Split Coast Stampers a couple of weeks ago--swoon).  I finally settled on Scor Tape where I applied the tape to cardstock then diecut the butterfly and poked all the little bits out.  Exactly what I was looking for.  Ain't no way that glitter is coming off again!

The Details:  Tim Holtz watercolor paper and Distress Inks in Walnut Stain, Faded Jeans, Dusty Concord, Peeled Paint, Pine Needle and Mown Lawn, Heartfelt Creations Hydrangea/Posy sentiment, Memory Box butterfly, Sugar Coating Lily White Glitter, PTI kraft cardstock

I'm entering this in Fantasy Stampers #14 CAS, Shopping Our Stash #160 Can't Put it Down (watercolors in my case),  Simon Says Spots & Dots  

Tuesday, July 15, 2014

Fishy Hello

 The latest CASology cue word is pet and I couldn't help but think of my 2 giant goldfish (not koi but palm-sized goldfish; my fav was white with just 2 little orange spots on its head) that died a couple of weekends ago after we changed the water in our pond.  I think I misjudged the pH and am now a fish mur-diddly-er-ler.  Thus, my homage to our dearly departed fishies.

I made my own stencils over the weekend using stencil plastic I found at Hobby Lobby and my Cameo.  (Note:  with this particular plastic I found a depth of 6 to work well.) I took the swirls stencil and taped it down over my cardstock.  I then took a VersaMagic chalk teardrop to add the white.  I totally could have used a sponge but because I was only pressing down and not swirling, I used the inkpad itself.  Loving how this turned out.

I then stamped the sentiments and bubbles.  The fish I fussy cut from a notecard set that someone was going to throw away at the office.  The horror, I know.  Gosh, almost forgot to mention I used Wink of Stella to add some sparkle to the fish for that hint of scale.


The Details:  Pop Tone cover stock in Sno Cone, WPlus9 Strictly Sentiments, Inkadinkado Cute Fish Cling, VersaMark Onyx Black, VersaMagic Cloud White, Pretty Pink Posh 4mm clear sequins, homemade stencil using Show-Offs stencil plastic, Wink of Stella Gl. Clear

I'm entering this in CASology #104 Pet, CAS on Sunday #37 One Layer Wonder, Addicted to Stamps & More #104 CAS    

Sunday, July 13, 2014

Birthday Minion + Instructions

My stepson's girlfriend's nephew's birthday's coming up (say that 5 times fast!) and she mentioned the party was going to be minion-themed.  Could. Not. Resist.

Body
  1. Cut a 4 x 5.25" piece of yellow card.
  2. Round the top corners.
  3. Attach to an A2  (4.25 x 5.5") black card base.
Goggles
  1. Cut a .5 x 4" strip of black cardstock.  This is the goggles strap.
  2. Adhere the black strip about 1.5" down the card.
  3. Cut two 1.25" circles in gray (shiny silver if you've got it would be ideal).
  4. Attach the two gray circles over the strip, centered vertically and horizontally.
Eyes
  1. Cut two 1" circles in white.
  2. Cut two .5" circles in brown.
  3. If you're going to use tiny black brads for the pupils, do so now.  Otherwise, draw in or use black Enamel Accents like I did at the end.
  4. Attach the brown circles to the white.
  5. Attach the eyes to the gray circles, centering vertically and horizontally.
Hair
  1. Cut narrow strips of 1.5" black cardstock.
  2. Glue down in your preferred style.
Mouth
  1. I used my largest circle die to cut a circle segment from black cardstock then cut it down to size.
  2. You could also just draw it in.
Overalls
  1. Cut a 1.5 x 2.5" piece of cardstock for the bib.  I used a dark blue here.
  2. Attach the bib to the bottom center of the yellow layer. 
  3. Cut two .5 x 3" strips of the same cardstock for the straps.  
  4. If you're using brads instead of buttons for the snaps, do so now.  Otherwise, wait until the end.
  5. Attach the straps to the bib at your preferred angle.
  6. Carefully cut away the excess strap.  I used an Exacto blade.
  7. Using a white pigment pen, draw in stitching lines as shown.
Now isn't that easy?

The Details:  Lifestyle Crafts circle dies, Enamel Accents, Sakura white pigment pen, Martha Stewart corner rounder, PopTone black licorice cardstock, PTI yellow cardstock, various scraps of other cardstock, Glossy Accents

I'm entering this in Seize the Birthday without Stars or Stripes topping, Cardz 4 Guyz DIY (the Minions from Despicable Me do everything from dusting to building spaceships--so cute!), Pal Paper Arts #211 Color challenge, The Sisterhood of Crafters Birthday


Saturday, July 12, 2014

Live Colorfully

I'm totally melting--sooooo hot.  It was 91 on our way back from the grocery this morning.  9. 1.  Here in the PNW, we generally have temperate summer days and thus many don't have A/C--ugh.  I might need to go shopping later just so I can be in a store with A/C.  Craft store, of course.  ;-)

For this card one layer card (haven't done one of those in a while), I used painter's tape to mask off the edges, stamped on some Versamark then embossed them in gold.  Next I randomly dabbed the butterfly stamp with Distress Inks.  Maybe I should have misted the stamp afterwards to blend a bit but I do like the boldness.  I added the sentiment and used Enamel Accents on each of the dots in LIVE which you totally can't see.  It's nice dimension and I like the shiny whiteness.  Finally I cut out some tiny butterflies in gold mirror board for some zip to tie it all together.

Tip:  With this gold embossing powder, it tends to stick even after applying cornstarch to the card so this time I created a mask to help keep the excess from sticking to the white space.  Way easier for me than trying to remove the stickies.

The Details:  PTI white cardstock, Inkadinkado Patterned Bugs stamp, Hero Arts Glow Girl sentiment, Versafine Onyx Black, Distress Inks in Peacock Feathers, Picked Raspberry, Spiced Marmalade, Salty Ocean, Mustard Seed, Mowed Lawn, gold embossing powder (I think Stampendous), Versamark, Memory Box butterflies die, Recollections gold mirror board

I'm entering this in Crazy for CAS #48 Butterflies, CAS on Sunday #37 One Layer Wonder, Clean and Simple Stamping #299 Sketch, Try It on Tuesdays Colours of Summer, Fab n' Funky #223 Feels like Summer 

edited to add Butterfly Challenge #10 OLC


Friday, July 11, 2014

Enjoying the Ride


As I perused my ribbon collection for the current HOC Add a Bow challenge, my eye kept coming back to this stitched grosgrain ribbon.  There's a lot of textural interest happening in a very simple ribbon. I immediately thought of blacktop--country roads--picnic--summer-- road trip--vacation.

I embossed the cloud design first then hand cut a hill out of a scrap of the two-tone green.  I adhered the ribbon down and tucked the ends under before using foam tape for the truck which I cut out of a summery gingham paper--ready for a picnic, anyone?  Popping the scene panel up adds an easy design detail that packs great punch.  This card really invites you to touch and examine the different layers while still remaining quite CAS.  Love!

The Details:   Papertrey Ink white cardstock, PopTone Black Licorice cardstock, Offray ribbon, Darice embossing folder, My Favorite Things You Move Me sentiment, Versamark Onyx Black, Martha Stewart gingham cardstock, Memory Box car die, 3M foam tape, Scotch ATG tape, Gelly Roll white pigment pen (hubcaps)

I'm entering this in Tuesday Throwdown #203 Have a Picnic, Try it on Tuesday Colours of Summer, Friday Mashup #168 It's Summer Y'all, Fab n' Funky #223 Feels Like Summer, Addicted to CAS #42 Sky,

Wednesday, July 9, 2014

Make Believe Card Kit

I have so many leftovers from the congrats card the other day that I've challenged myself to use them up--homemade card kit!

For this card I randomly cut out the center of the hexagon diecut and arranged the designer papers in the shape of a flower.  No reason, just liked it.  I added a couple of vellum feathers, sequins and a sassy gold sentiment (a couple of layers of that for greater dimension).  The lower right felt unbalanced so I whacked off the corner.  Notice I didn't fully glue down the hexagon panel or feathers--easy way to add texture and dimension without bulking up the card.  Ready for mailing!

The Details:  PTI kraft and blue-green cardstock and honeycomb die, Speckletone Madero Beach White 80# coverstock, My Mind's Eye Away We Go 6x6 designer papers, WPlus9 Fanciful Feathers Die, vellum, Lawn Fawn sentiment, Martha Stewart corner rounder

I'm entering this in Retrosketches #122, Moxie Fab Wonderful Words Challenge, Simon Says Wednesday Let's Be Clear,    

Monday, July 7, 2014

Easy Balloons Birthday

Oh, happy day!  Behold my first contribution as a member of the House of Cards design team. Woo hoo!  This time around the challenge asks you to add a bow or two or three to your card.  Just think of the bezillion possibilities.  Won't you play along with us?!

I need a male birthday card very soon so decided to challenge myself to use a bow in it.  A bow and keep it manly?  Eek!  The first thing I did was to add shimmer spritz to the background (c'mon, everyone likes glitter, right?).  I then cut out the balloons in coordinating designer card.  I attached the baker's twine to the back of the balloons with extra length so I could play around with balloon placement.  Once I determined where I wanted them to go, I adhered the balloons to the card using various thickenesses of foam tape, gathered up the strings, tied the bow, glued the bundle down and cut the excess.  Easy peasy and a great way to use up scraps.

Almost forgot, I used chalk ink around the balloons to soften the edges.

The Details:  PTI white and yellow cardstock, The Good Life 12x12 designer cardstock, Penny Black Cupcakes sentiment, Versamark Onyx Black, Imagine Crafts Sheer Shimmer Spritz in frost, balloons cut on the Cricut, Darice Baker's Twine, Glossy Accents, foam tape, Attic Dust chalk ink

I'm entering this in Seize the Birthday (wouldn't it have been so cool to have the balloons have a July 4th theme?).

Sunday, July 6, 2014

Bicycle Shaker Tutorial

I enjoyed making the music shaker so much I worked up two more using my bicycle die.    The first has the shakers as the wheels and a fun rainbow ombre watercolor wash.  For that I layered narrow bands of colors on watercolor paper, letting them overlap to create a nature looking gradation. The second card has the shaker as part of the basket--I was thinking a basket full of flowers here.  So fun!  I love, love, love how the embossing and impressing turned out.  Such very different cards although using the same elements.

Step 1:  I embossed the clouds until about halfway down the card.  My folder didn't cover the entire front so I used a stylus and the embossing folder to add a couple more clouds on the right.


Step 2:  I wanted grass but didn't want another layer so I impressed it.  Notice how I changed the vertical position each time I impressed it.
Step 3:  I die cut the bicycle, keeping all of the interior pieces.  I didn't keep the main bicycle diecut because it had impressed grass in it.  Instead, I cut out a second bicycle from another cardstock.
Step 4:  I thoroughly taped down the bicycle to the card, excluding only those areas where the shakers were going to be.
Step 5:  I glued my transparency film behind the wheels then built the shaker barriers out of a double layer of foam tape.  I enclosed the shakers using diecut circles.  I then added more foam tape along the edges and open areas of the card before adhering to the base.
Alt: For the basket I die cut a circle around the basket before taping the bicycle back in then proceeded largely as described above.

The Details:  Marianne Designs bicycle die, PTI cardstock and "celebrate" sentiment, Penny Black Nature's WIshes sentiment, Darice embossing folder, Savvy Dies grass, Pretty Pink Posh clear 4mm sequins, Lifestyle Crafts plain circle die, My Favorite Things Stitched Circle die, Versamark Onyx Black ink, foam tape, patience

I'm entering this in Addicted to Stamps and More Make Your Mark, Simon Wednesday Shake It, Just Add Ink Shakers, The Friday Mashup #167 WaterColor Wash, Virginia's View Challenge #5 Die Cuts, AAA Cards #10 Watercolor, TIME OUT #9 Fun in the Sun     

Saturday, July 5, 2014

Behind the Music

This card is for a colleague who was offered his dream position and will be leaving our office soon--insert heavy sigh.  I will miss him dearly.  I knew I wanted to incorporate music into his card in some way since that's his passion (and related to his new position--how cool is that) but it wasn't until I saw Jennifer McGuire's suspension window tutorial over at Virginia's View that everything fell into place. I used the easier option 2 that Jennifer demonstrates due to the intricacy of the die.

I did a rainbow watercolor wash on the shaker panel for some visual kick behind the music. Love how that looks.  You know, I ran cornstarch around the inside of the shaker to avoid sequins sticking to the foam tape but they still do.  Perhaps I'm misremembering the tip I had read some time ago.

The Details:  PTI white and purple cardstock, Versamark Black Onyx ink, Tim Holtz watercolor paper and Distress Inks (chipped sapphire, red brick, mustard seed, dusty concord), Memory Box Party Music die, Hero Arts Everyday Sayings sentiment

I'm entering this in Simon Wednesday Shake It, Stampin' Royalty Keep It Simple, Just Add Ink Shakers, The Friday Mashup #167 WaterColor Wash, Virginia's View Challenge #5 Die Cuts


Friday, July 4, 2014

Live Your Adventure


This card is for someone who will be moving to the other side of the world after graduating with her PhD.  Can't get much more adventurous than that, huh.  I tried to capture her sweet, wholesome nature in paper and know the honeycomb quilted look is right up her alley.

I was really smitten by the latest CASE Study by Shari Carroll--there's lots going on but still a clear focus.  I tend to lean CAS so this one presented a fun way to maintain that and still add in some bits I perhaps wouldn't normally.


The Details:  PTI kraft cardstock and honeycomb die, Speckletone Madero Beach White 80# coverstock, My Mind's Eye Away We Go 6x6 designer papers and The Sweetest Thing layered sticker, WPlus9 Fanciful Feathers Die, Tim Holtz Distress Walnut Stain Ink, vellum, hemp twine